






















Mount Weaviate Secrets using CSI Driver
Kubernetes Secrets Store CSI Driver
Secrets Store CSI driver for Kubernetes secrets - Integrates secrets stores with Kubernetes via a Container Storage Interface (CSI) volume.
The Secrets Store CSI driver secrets-store.csi.k8s.io allows Kubernetes to mount multiple secrets, keys, and certs stored in enterprise-grade external secrets stores into their pods as a volume. Once the Volume is attached, the data in it is mounted into the container’s file system.
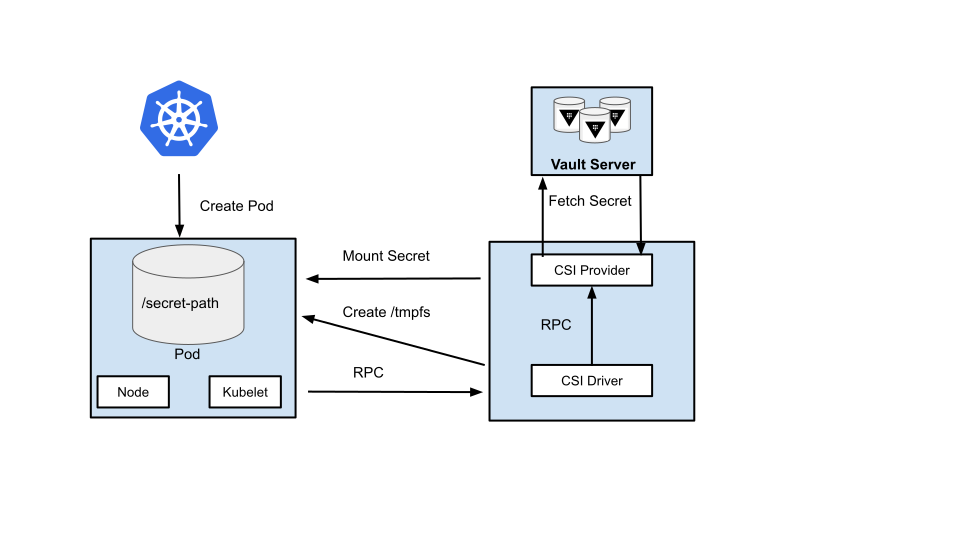
When the Pod is created through the K8s API, it’s scheduled on to a node. The kubelet process on the node looks at the pod spec & see if there’s any volumeMount request. The kubelet issues an RPC to the CSI driver to mount the volume. The CSI driver creates & mounts tmpfs into the pod. Then the CSI driver issues a request to the Provider. The provider talks to the external secrets store to fetch the secrets & write them to the pod volume as files. At this point, volume is successfully mounted & the pod starts running.
You can read more about the Kubernetes Secrets Store CSI Driver here.
Consuming Secrets
At first, you need to have a Kubernetes 1.16 or later cluster, and the kubectl command-line tool must be configured to communicate with your cluster. If you do not already have a cluster, you can create one by using kind. To check the version of your cluster, run:
$ kubectl version --short
Client Version: v1.21.2
Server Version: v1.21.1
Before you begin:
- Install KubeVault operator in your cluster from here.
- Install Secrets Store CSI driver for Kubernetes secrets in your cluster from here.
- Install Vault Specific CSI provider from here
To keep things isolated, we are going to use a separate namespace called demo throughout this tutorial.
$ kubectl create ns demo
namespace/demo created
Note: YAML files used in this tutorial stored in examples folder in GitHub repository KubeVault/docs
Vault Server
If you don’t have a Vault Server, you can deploy it by using the KubeVault operator.
The KubeVault operator can manage policies and secret engines of Vault servers which are not provisioned by the KubeVault operator. You need to configure both the Vault server and the cluster so that the KubeVault operator can communicate with your Vault server.
Now, we have the AppBinding that contains connection and authentication information about the Vault server. And we also have the service account that the Vault server can authenticate.
$ kubectl get appbinding -n demo
NAME    AGE
vault   50m
Enable & Configure Weaviate SecretEngine
Enable Weaviate SecretEngine
$ kubectl apply -f docs/examples/guides/secret-engines/weaviate/secretengine.yaml
secretengine.engine.kubevault.com/weaviate-engine created
Create WeaviateRole
The WeaviateRole specifies the roles assigned to the dynamically created Weaviate user:
apiVersion: engine.kubevault.com/v1alpha1
kind: WeaviateRole
metadata:
  name: weaviate-app-role
  namespace: demo
spec:
  secretEngineRef:
    name: weaviate-engine
  defaultTTL: 24h
  maxTTL: 168h
  creationStatements:
    - |
      {
        "roles": [
          "viewer"
        ]
      }
$ kubectl apply -f docs/examples/guides/secret-engines/weaviate/secretenginerole.yaml
weaviaterole.engine.kubevault.com/weaviate-app-role created
Let’s say pod’s service account name is test-user-account located in demo namespace. We need to create a VaultPolicy and a VaultPolicyBinding so that the pod has access to read secrets from the Vault server.
Create Service Account for Pod
Let’s create the service account test-user-account which will be used in VaultPolicyBinding:
apiVersion: v1
kind: ServiceAccount
metadata:
  name: test-user-account
  namespace: demo
$ kubectl apply -f docs/examples/guides/secret-engines/weaviate/serviceaccount.yaml
serviceaccount/test-user-account created
Create SecretRoleBinding for Pod’s Service Account
SecretRoleBinding will create VaultPolicy and VaultPolicyBinding inside vault.
When a VaultPolicyBinding object is created, the KubeVault operator creates an auth role in the Vault server. The role name is generated by the following naming format: k8s.(clusterName or -).namespace.name. Here, it is k8s.-.demo.weaviate-app-role.
apiVersion: engine.kubevault.com/v1alpha1
kind: SecretRoleBinding
metadata:
  name: secret-role-binding
  namespace: demo
spec:
  roles:
    - kind: WeaviateRole
      name: weaviate-app-role
  subjects:
    - kind: ServiceAccount
      name: test-user-account
      namespace: demo
Let’s create SecretRoleBinding:
$ kubectl apply -f docs/examples/guides/secret-engines/weaviate/secretrolebinding.yaml
secretrolebinding.engine.kubevault.com/secret-role-binding created
Check if the VaultPolicy and the VaultPolicyBinding are successfully registered to the Vault server:
$ kubectl get vaultpolicy -n demo
NAME                                         STATUS    AGE
srb-demo-secret-role-binding                 Success   8s

$ kubectl get vaultpolicybinding -n demo
NAME                                            STATUS    AGE
srb-demo-secret-role-binding                    Success   10s
Mount secrets into a Kubernetes pod
So, we can create SecretProviderClass now. You can read more about SecretProviderClass here.
Create SecretProviderClass
Create SecretProviderClass object with the following content. The secretPath points at database/creds/<role> and mounts the generated API key:
apiVersion: secrets-store.csi.x-k8s.io/v1alpha1
kind: SecretProviderClass
metadata:
  name: vault-db-provider
  namespace: demo
spec:
  provider: vault
  parameters:
    vaultAddress: "http://vault.demo:8200"
    roleName: "k8s.-.demo.weaviate-app-role"
    objects: |
      - objectName: "weaviate-api-key"
        secretPath: "your-database-path/creds/k8s.-.demo.weaviate-app-role"
        secretKey: "password"
$ kubectl apply -f docs/examples/guides/secret-engines/weaviate/secretproviderclass.yaml
secretproviderclass.secrets-store.csi.x-k8s.io/vault-db-provider created
Note: The
SecretProviderClassneeds to be created in the same namespace as the pod.
Create Pod
Now we can create a Pod to consume the dynamic Weaviate API key. When the Pod is created, the Provider fetches the secret and writes it to Pod’s volume as a file. At this point, the volume is successfully mounted and the Pod starts running.
apiVersion: v1
kind: Pod
metadata:
  name: demo-app
  namespace: demo
spec:
  serviceAccountName: test-user-account
  containers:
    - image: jweissig/app:0.0.1
      name: demo-app
      imagePullPolicy: Always
      volumeMounts:
        - name: secrets-store-inline
          mountPath: "/secrets-store/weaviate-creds"
          readOnly: true
  volumes:
    - name: secrets-store-inline
      csi:
        driver: secrets-store.csi.k8s.io
        readOnly: true
        volumeAttributes:
          secretProviderClass: "vault-db-provider"
$ kubectl apply -f docs/examples/guides/secret-engines/weaviate/pod.yaml
pod/demo-app created
Test & Verify
Check if the Pod is running successfully, by running:
$ kubectl get pods -n demo
NAME                       READY   STATUS    RESTARTS   AGE
demo-app                   1/1     Running   0          11s
Verify Secret
If the Pod is running successfully, then check inside the app container by running:
$ kubectl exec -it -n demo pod/demo-app -- /bin/sh
/ # ls /secrets-store/weaviate-creds
weaviate-api-key

/ # cat /secrets-store/weaviate-creds/weaviate-api-key
w-some-dynamic-api-key

/ # exit
The dynamic API key is mounted into the pod. The application can read this file and present it to Weaviate in the Authorization: Bearer <token> header.
Cleaning up
To clean up the Kubernetes resources created by this tutorial, run:
$ kubectl delete ns demo
namespace "demo" deleted